Roof underlayment and flashing

Roof underlayment and flashing are two important components of a roofing system that play a crucial role in protecting a building from water damage. In this post, we will delve into the details of roof underlayment and flashing, explaining what they are, how they work, and why they are important.

Roof underlayment is a layer of material that is installed under the roofing material to provide an extra layer of protection for the roof. It is often made of a synthetic material such as felt paper, rubberized asphalt, or a synthetic polymer. Roof underlayment is installed on top of the roof deck and under the roofing material, and serves as a secondary water barrier in case the primary roofing material fails.

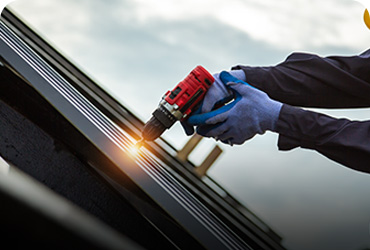
Roof flashing is an important component of a roofing system because it helps to prevent leaks and water damage to the roof and the building.

Roof flashing is a thin material, usually made of metal, that is used to seal the joints and seams on a roof. It is typically installed around areas of the roof that are prone to leaks, such as chimneys, skylights, and vents. Roof flashing is designed to prevent water from seeping through these joints and into the building.

Roof underlayment works by providing a layer of protection between the roof deck and the roofing material. It acts as a barrier to prevent water from seeping through the roof and into the building. When installed properly, roof underlayment can help to prevent leaks and water damage to the roof and the building.

Roof flashing works by sealing the joints and seams on a roof, preventing water from seeping through these areas and into the building. It is typically installed around areas of the roof that are prone to leaks, such as chimneys, skylights, and vents. When installed correctly, roof flashing helps to prevent leaks and water damage to the roof and the building.

Roof underlayment is an important component of a roofing system for several reasons. First and foremost, it provides an extra layer of protection against water damage. If the primary roofing material fails, the roof underlayment can help to prevent leaks and water damage to the roof and the building. In addition, roof underlayment helps to prevent moisture from accumulating on the roof deck, which can lead to rot and other types of damage.

How to Get Your Roof Ready for a Maine Winter

Hey there, fellow Mainers! We all know that when the leaves start changing and the air gets that crisp chill, winter is just around the corner. And let’s face it, winters here aren’t exactly mild. Snowstorms, ice, freezing temps—you name it, we’ve got it. So, before the first flakes start to fall, it’s a good idea to make sure your roof is up to the challenge. Here’s how you can prep your roof to handle whatever Mother Nature throws our way this winter.


snow roof maine


1. Give Your Roof a Once-Over


First things first, take a good look at your roof.

 
  • Check for Damaged Shingles: Keep an eye out for any shingles that are missing, cracked, or curling. These can let water seep into your home, and nobody wants that.

  • Look at Flashing and Seals: Check around chimneys, vents, and skylights to make sure the flashing and seals are in good shape. If they’re not, you might end up with leaks.

  • Spot Any Sagging Areas: If parts of your roof look like they’re sagging, that could mean there’s some structural damage. Better to catch that now than in the middle of a blizzard.


Tip: If you’re not comfortable climbing up there yourself (and who could blame you?), consider hiring a professional to do the inspection.


2. Clean Out the Gutters


Clogged gutters are a recipe for disaster when the snow starts melting.

 
  • Remove Leaves and Debris: Get rid of all the gunk that’s built up in your gutters and downspouts. This helps prevent ice dams, which can cause water to back up under your shingles.

  • Ensure Proper Drainage: Make sure water can flow freely through the downspouts and away from your house.


3. Trim Overhanging Branches


Those beautiful trees around your house? They can be trouble for your roof in winter.

 
  • Cut Back Branches: Trim any branches that hang over your roof. Heavy snow can cause them to break and damage your roof—or worse, hurt someone.


4. Boost Your Attic’s Insulation and Ventilation


A well-insulated and ventilated attic can make a big difference.

 
  • Add Insulation: Proper insulation keeps warm air inside your home, which helps prevent ice dams on your roof.

  • Check Ventilation: Good ventilation keeps your attic cool and dry, reducing moisture that can damage your roof from the inside out.


5. Install Ice and Water Shields


Think of these as extra protection where your roof needs it most.

 
  • Focus on Vulnerable Spots: Place these shields along the edges of your roof, in the valleys, and around chimneys and vents.

  • Get Professional Help: Installing these correctly is key, so you might want to bring in a pro.


6. Consider Roof Heating Cables


If ice dams are a recurring problem, heating cables might be the way to go.

 
  • Install Along Roof Edges: These cables help melt snow and ice, preventing buildup.

  • Follow Instructions Carefully: Make sure to install and use them according to the manufacturer’s guidelines for safety.


7. Fix Any Issues Now


Don’t wait until small problems become big ones.

 
  • Replace Damaged Shingles: Swap out any that are cracked or missing.

  • Seal Up Leaks: Use roofing sealant to fix minor leaks or gaps.


8. Get a Pro’s Opinion


Sometimes, it’s best to call in the experts.

 
  • Schedule a Professional Inspection: A roofer can spot issues you might miss and suggest the best fixes.

  • Stay Safe: Letting the pros handle it keeps you off the ladder and out of harm’s way.


9. Prepare for Snow Removal


Heavy snow can put a lot of strain on your roof.

 
  • Invest in a Roof Rake: This tool lets you remove snow from the ground, which is much safer than climbing up there.

  • Know When to Call for Help: If the snow gets too heavy or hard to reach, it’s time to bring in professionals.


10. Check Your Home Insurance


It’s always good to know what your policy covers.

 
  • Review Your Coverage: Make sure you’re protected against winter-related damage.

  • Document Everything: Keep records of your roof’s condition and any maintenance or repairs you do.


Wrapping Up


Getting your roof ready for winter might not be the most exciting task, but a little effort now can save you a lot of hassle (and money) later on. Plus, you’ll have peace of mind knowing your home is protected against the harsh Maine winter. So grab that ladder (or ask our pros and receive an instant quote below) and get started. Stay warm and safe out there!


Get connected with the top-rated roofing contractors in Maine

Address

201 Mariner Way
Biddeford, ME 04005
207-417-4666

Subscribe

Subscribe to our Newsletter and get connected with our latest news.

    Copyright © 2021 Southernmaineroofs. Creation of pixelweby.